mulberryshoots

"Tell me, what is it you plan to do with your one wild and precious life?" ~ Mary Oliver

Category: Food

a simple meal in a heat wave! . . .

DSCN0760DSCN0762.jpgYears ago, I had lunch at “The Tea Box” a bento box restaurant inside Takishimaya, a jewel of a department store in New York City. The restaurant is closed now, but fortunately, the chef, Ellen Greaves published a cookbook called “Simple Meals for the Bento Box”  I have two copies of the book here and have also given copies of the book as gifts. In it, there is a recipe for a pea soup that we enjoyed ourselves at the restaurant when it was still open. It’s on the stove now, waiting for final preparations right before serving.

Sweet Pea Soup (adapted from cookbook above):

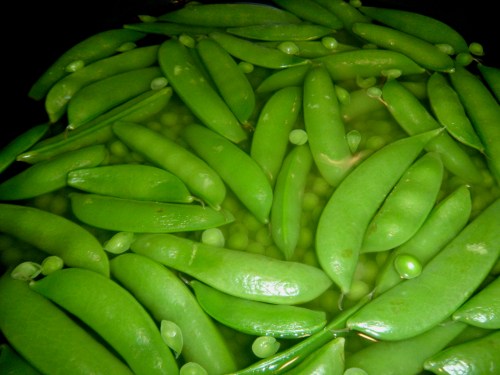
Heat one cup of chicken broth plus one cup of spring water in a pot on the stove. Rinse a package of snap peas (8 ounces) and put in the broth when it’s boiling. Simmer gently for one minute. Add a 16 ounce package of frozen petite sweet peas into the broth. Simmer for 5 minutes and turn off the heat. Leave it alone until dinnertime.DSCN0765

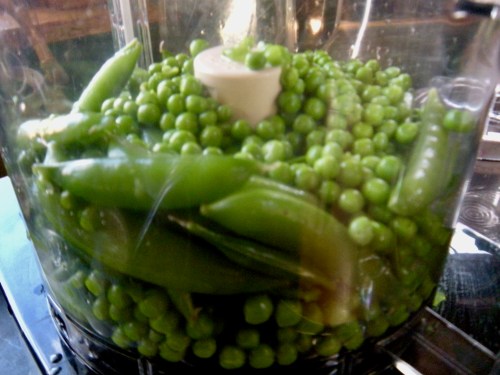
Finishing steps; spoon out drained peapods and peas into a food processor. Add the broth liquid and puree until smooth. Be sure to put the soup through a fine sieve, stirring to allow as much liquid through as possible. If not put through a sieve, the soup has a grainy texture. DSCN0768 (1).jpg
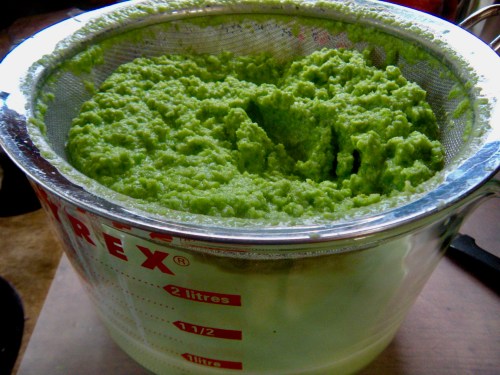
Add a little cream to taste, salt and pepper and serve with snipped chives on top.

To go along with the soup, I made a mixture of cream cheese, fresh chives and smoked salmon in a bowl.  Open a packet of cream cheese and let come to room temperature in a bowl. Snip in some fresh chives – about a dozen short stems. Open a pack of smoked salmon – a small one, bits, or on sale. And with a paring knife, cut the salmon and chives into the cream cheese until roughly combined. Cover with plastic wrap and chill.

When ready for supper, toast two sesame bagels, cut in half.  Finish the sweet pea soup and serve in some pretty bowls. Place the smoked salmon gamish on the table and rinse some fresh lettuce, tomatoes and fresh basil on a separate plate. Voila! . . . a delicious supper on a sweltering day!

For dessert, I sliced up two white peaches that have been sunning themselves on the kitchen counter. Squeezed a little fresh lemon juice and added a couple of spoonfuls of turbinado sugar. Covered with plastic wrap and chilled. When ready to serve, spoon out the macerated peaches and add some light cream. It will thicken due to the lemon juice. Yum!

Footnote: Reminded of this soup, I took out the cookbook and am re-inspired to cook bento box size servings for appetizing but small portions of food for the rest of the summer. I have two bento boxes that I bought at Takashimaya those 20 years ago which contain four different kinds of serving dishes. They are spectacular and I am so glad that I have them now. Along those lines, I also thought about apportioning our meals in separate portion serving trays and found these on Amazon. They’ll be perfect for everyday use – and be lots of fun besides. We’ll eat really well in small portions – and I look forward to this new adventure to cooking smaller portions while enjoying them more!

Advertisement

easy summer meatballs. . .

DSCN0754It’s a Sunday afternoon and I thought I’d make a batch of meatballs between watching the World Cup and NCIS LA (yeah!) I used to brown and fry the meatballs in a big skillet which resulted in a lot of fat/grease. Now I don’t. I’ve learned from Julia Turshen (she uses ground turkey, I use ground 80% beef) that it’s a LOT easier to combine ingredients with the meat and then form meatballs, letting them cook in a 400 degree oven for about 20-25 minutes.

Here’s my go-to recipe for meatballs:DSCN0750

  1. 1 pound of 80% ground beef
  2. Lawry’s garlic salt
  3. shredded vidalia onion (1/2 of a big one)
  4. Pepperidge farm classic seasoned bread crumbs
  5. 1 large egg
  6. about a 1/2 cup milk

Line a large sheet pan with aluminum foil; spray with Pam.

In a large mixing bowl, I turn the ground beef to break it up. Sprinkle with Lawrys’ and turn it over – add egg and mix well; shred raw onion on the large whole of a box grater; add to mix along with milk. Pour in about 1 cup of breadcrumbs, eliminating the big hard chunks. Mix well together.

DSCN0752
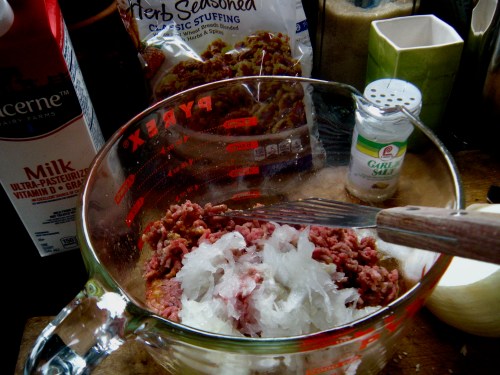
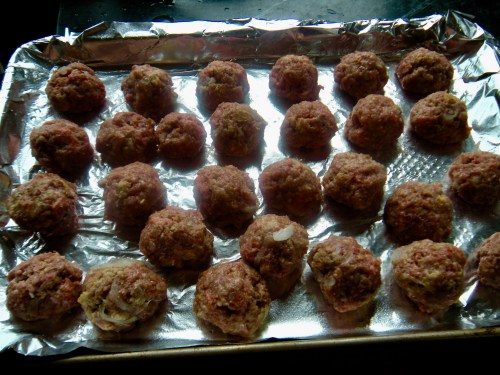
Form meatballs (I got 28 from this recipe) and place on the cookie sheet – together but not touching. Preheat the oven to 400 degrees. Bake for 20-25 minutes until done and not pink in the middle. Let COOL. I store these 7-8 in a small freezer bag and put them into the freezer. When I’m looking for something to have for dinner, they’re there for a) spaghetti and meatballs with Ragu classic tomato sauce or; b) swedish meatballs and noodles (stroganoff with sour cream and beef broth.)  These should last through most of the summer and mmmmm they smell really good right now in the oven!

Hooray!


really “crazy bark” for final exams. . . !

My granddaughter, A., is studying for her final exams of her senior year at JHU. As you might recall, these are the ones that really count since 2nd semester is usually taken up with job interviews, graduate school applications and other things that Seniors occupy themselves with.

In honor of this intense timeframe, I’m making up a “Care Package” to send tomorrow. This morning, I made a big batch of rice crispy marshmallow treats.

Then, I made some “really crazy bars” copied from Ree Drummond’s recipe online. Here’s what I used:

  1. Chocolate honey graham crackers (put sugar side down so it will show later after you’ve piled all the goodies on top.
  2. Hershey’s milk chocolate bars (3) – which I thought were white chocolate because the wrapper was white, aiming for almond bark but couldn’t find any of either in the store. Chocolate on top of chocolate didn’t sound too bad, though.
  3. Melted the chocolate in a double boiler set on low heat on the stove.
  4. Laid out the chocolate graham crackers on to two baking sheets, cutting some of them to fit the entire sheets.
  5. Spread the slightly cooled melted chocolate on top of the graham crackers, smoothing it out with a spatula so all the crackers are covered.
  6. Then the toppings were added: Peanut M & M’s; Reese’s pieces in M-M form; salted stick pretzels, broken up (you want a combo of sweet and salty which are crunchy and chewy!)  Salted macadamia nuts, cut up into smaller pieces; mixed nut topping; cut-up bite-size Kit Kats, two kinds of multi-color sprinkles that filled up all the chocolate spaces.
  7. Pressed the toppings gently into the chocolate; covered with clingwrap and put in the fridge for the whole thing to harden.
  8. Later, will break the “bark” into manageable pieces and pack up in aluminum pans and wrap up for mailing.

I don’t even want to know how much sugar there is in these crazy bark pieces – the only way I can rationalize it is that they represent ALL the sugar I’m NOT going to be eating for the next five weeks!  YAY!

This is crazy, isn’t it? College students are young so they’ll probably be able to take it. Hope so, anyhow! Happy Exams!!


cheese straws for final exam munching! . . .

My granddaughter is studying for her final exams and I thought I’d make up a quick recipe of cheese straws. It’s an easy recipe that calls for:

1 stick unsalted butter, softened and beaten with a mixer until creamy. Add 2 cups of shredded cheese (cheddar & Parmesan) and mix with butter; add 1 1/4 cups flour, 1/2 teaspoon salt, 1/4 teaspoon cayenne.  The mixture was a little crumbly so I added a dash of half-and-half just so I could roll it out. Using a pie crimp cutter, I cut the dough into strips and baked them for about 17 minutes in a 350 oven.

My husband came out from his study and asked what was cooking because it smelled so divine while baking. When I took them out and tried a few bits, I found that they needed a little more salt – so I sprinkled some sea salt flakes on top after they cooled.

Once they’re stone cold, I’ll pack them up in an aluminum loaf pan with a cover inside a box and send it on its way to dorm-land. They might last 15 minutes – okay, maybe 20?

They’re fragrant and tasty. Next time, I’ll add a little more cheese and salt. I’ll also be mindful of how I measure the flour – not packed, because I think that’s what accounted for the mixture being crumbly.


Roasted acorn squash and wild rice . . .

Last week, I saw a photo of a stuffed acorn squash recipe that looked promising. The only reservation I had as I selected a medium size squash was how to cut it crosswise into thick rings.

And it wasn’t easy either, I would caution you. First, I cooked a packet of Minnesota wild rice in a pan along with a handful of golden raisins. Alongside, I sauteed fresh mushroom pieces with some diced red onion. Once the rice was cooked, I thought it was a little too wet and sauteed it (like fried rice) with the mushroom onion mix until the moisture was absorbed.

Cutting the acorn squash lengthwise required a sharp weighty bread knife, alternating with a sharp-pointed slicing knife. Between the two of them, I managed to make 1-inch slices, cleaning out the seeds. On a baking sheet, I added a little spring water to the aluminum foil in the pan before placing the squash slices in a 400 degree oven. Forty-five minutes later, I melted some butter, added it to brown sugar and glazed the tops of the squash, letting it cook 15 minutes longer. By this step, the acorn squash was cooked through before adding rice to it.

When cooled, I poured off any residual water in the baking pan, and scooped a handful of the wild rice mushroom mixture into each opening. I brushed the edges of the squash with the brown sugar/butter glaze.

Before serving, I’ll pop the stuffed squash into a 375 degree oven for another 20-30 minutes. Along with the squash, I’m baking a batch of Pillsbury buttermilk biscuits (they’re handy to have in the fridge for meals like this.)

We just enjoyed this supper – a new dish for us, and it was really delicious! We’re fans of golden raisins and they were plumped up from being cooked with the wild rice. I ate the peel of the squash and G. ate the squash from the inside out – but we both agreed it was really tasty! A keeper!


New England apple pie! . . .

Today, I made an apple pie for us to enjoy while we watch the Patriots game against Tampa Bay tonight. It’s been ideal New England Fall weather the last couple of days although it’s quite a bit warmer today. Despite that, I picked up some Cortland apples at the store to make an old-fashioned apple pie. Recently, it’s occurred to me that I enjoy making (and eating) pies more than making cakes. I don’t really know why, but it’s a really different cooking process and eating experience too!

The biggest difference of course is the crust. I confess I used to buy frozen pie crusts and just use two of them over the cored apple mixture. But recently, I’ve been interested in making pie crust from scratch. The last time, I used too much ice water to the flour/fat mixture and the resulting crust was hard and not tender at all.  This time, here’s what I did for my second try at homemade pie crust:

  1. Measured 2 1/2 cups of King Arthur flour into the bowl of  my Cuisinart
  2. Took two very cold (hard) sticks of unsalted butter from the fridge.
  3. Unwrapped them, cut them lengthwise twice, and then into small bits.
  4. Put the bits of cold butter into the Cuisinart and pulsed a couple of times until the butter was incorporated in tiny bits in the dry flour.
  5. Added salt (1/2 teaspoon); Added scant 1/2 cup of ice water while pulsing the mixture until it was still crumbly but still able to be patted into a ball without any other handling when I turned the machine off.
  6. Wrapped up the ball of crust (for bottom and top crusts) and refrigerated for about 4 hours (honestly!)

To make the filling and finish making the pie:

  1. I peeled about 8 Cortland apples (I have a new peeler for thin skins like peaches, tomatoes and apples – it works great!)
  2. Sliced the usable apple pieces into a bowl, discarding bruised spots, cores and skin.
  3. In a separate large bowl, I mixed together 1/3 cup of flour, 1/3 cup of sugar, 2 heaping teaspoons of Indonesian cinnamon spice; 1 heaping teaspoon of nutmeg, salt. Mixed the dry ingredients together really well and poured the prepared apple pieces into it, mixing well with my hands.
  4. Then poured the coated apple mixture back into the pie crust and dotted the top with bits of butter.
  5. I rolled out the top crust and used a crimped scone cutter to make impressions into the crust for decoration and also to provide steam holes when the apples bake. Crimped the edge into a pretty design and sprinkled the top of the pie with a little sugar.
  6. I tore three lengths of aluminum foil and wrapped them around the crust so that it wouldn’t burn prematurely.
  7. Into a preheated 400 degree oven, I turned on the oven light and set the timer for an hour.

We like to reheat the pie right before eating so it’s still a bit warm. With some vanilla ice cream, it’s a dream dessert. Especially here in New England during apple season and when we’re looking forward to watching a football game tonight!

Go Pats!

Sunday meatballs for after the game! . . .

It is the most glorious Sunday, weather-wise at least – and I decided to make a batch of meatballs to stir into sauce for our supper tonight after the Patriots play this afternoon.

I discovered that baking meatballs on cookie sheets is a much simpler and easier way to make meatballs than browning them in a skillet and turning them over. Here’s a very simple and tasty recipe that I use, sometimes I use ground turkey and sometimes a meatloaf mixture of ground veal, pork and beef.

  1. Pour about 2/3rds cup of dry Pepperidge Farm stuffing crumbs into a bowl.
  2. Add milk to moisten – but not runny – about 1/2 cup.
  3. Grate a raw onion half into the crumbs; sprinkle generously with Lawry’s garlic salt and freshly ground pepper; add dried parsley flakes.
  4. Add an egg and mix the whole thing together until well blended.
  5. Add a pack of meatloaf mixture into the breadcrumb/onion mixture.
  6. Blend gently until the ground meat and crumb mixture are combined.
  7. Line 2 cookie sheets with parchment paper and preheat oven to 375 degrees.
  8. Using your hands, gently form meatballs that are not too big and not too small and place on the sheets so they are not touching each other.
  9. Bake for about 25-30 minutes. The meatballs will continue cooking after they’re taken out of the oven.
  10. Depending on the size of the meatballs, I’ll save 3-4 each serving for spaghetti tonight (Ragu sauce, thin spaghetti, hand grated parmesan cheese on top.)
  11. Then when the meatballs are cool, I’ll freeze them in packs of 6-8 where they will come in handy to serve either Swedish meatballs (beef broth and sour cream with parsley and noodles) or more Spaghetti and meatballs.

This is a foolproof, quick to put together recipe to make a lot of meatballs! They’re tender and full of flavor. Enjoy!


salmon “poke” salad with seaweed and jasmine rice


We’re fortunate to live in New England so the fish that is sold at fish markets and even grocery stores is pretty high quality most of the week. I was a little hesitant to buy salmon on a Monday but it turned out to be tasty in a “poke” salad bowl that I served for dinner tonight along with freshly made jasmine rice.

Sometimes in Hawaii where the “poke” (pronounced po’kay;) tradition emanates, they place the marinated raw fish on a mound of rice. I avoided that because I didn’t want the temperature of the warm rice to diminish the freshness of the raw salmon. So, here’s how I put together this dish:

  1. I bought 3/4 pound of the freshest salmon I could find today.
  2. Also picked up a container of seaweed salad which added a wonderful taste to the salad.
  3. I skinned the fillet of salmon after rinsing it in cold water and drying it with paper towels. I then cut it up in medium sized cubes.
  4. For a marinade, I put powdered wasabi in a bowl, added Ohsawa soy sauce, diluted it with a little cold water, added sesame oil, and a squeeze of fresh lime juice. A tiny bit of honey to take the edge off – then added a few spoonfuls of the marinade on the fish, turning it around and then put it in the fridge. This was about half an hour before dinner.
  5. I cooked jasmine rice in my rice cooker and served it in separate bowls. We really like this rice, especially when it’s made right before we eat and served hot.
  6. Preparing the salad included using two shallow bowls, lining it with fresh lettuce, cut up endive, a Persian cucumber quarter cut and lightly covered with the same marinade as for the salmon.
  7. Then, I piled up the marinated salmon in the middle and finished it with the seaweed salad ringed around it with some on top of the fish.

We enjoyed this supper because the tastes were very clean and all in all, it was pretty healthy too.

fresh spinach! . . .

At the farmstand this week, I picked through some farm grown spinach for tender sprouts of spinach. Back home, I showed it to G. and he suggested we have it for dinner – all of it! So, I made a spinach souffle from scratch after soaking the spinach to get rid of the grit – and saved the tender leaves for a salad to go alongside.

Making spinach salad is one of my favorites because I cook a few slices of bacon, break it up and slice up a fresh mushrooms dressed with a simple vinaigrette. It’s tasty and refreshing!


homemade lobster macaroni and cheese! . . .

Yesterday at the Stop and Shop, I happened upon a small cooked lobster at the seafood counter. I picked it up and asked the counterwoman if there were any more and she said she hadn’t had any time to steam any more because it had been so busy.

I decided to buy it anyhow and shelled it when I got home, thinking there might just be enough for a couple of lobster rolls for dinner but there didn’t seem to be enough for two of us.  Somehow, I got distracted and I decided to make the wild mushroom pasta with lemon sauce instead. So, what to do with the shelled lobster?

Many places I have looked feature a lobster macaroni and cheese dish which I’ve always thought was a cringe-worthy gilding the lily kind of dish. I mean, why would anyone put lobster into mac and cheese? Well, tonight, I’m going to find out. I looked at numerous lobster mac and cheese recipes online (Ree Drummond, Ina Garten, Bobby Flay,) and was struck by how expensive and how many types of cheese were included in their recipes to make the dish: cheddar, gruyere, goat cheese, fontina, pecorino, parmesan and on and on.

Being somewhat of a luddite when it comes to making an erstwhile pretty simple dish for supper, I went to the grocery store and bought extra-large elbow macaroni (the better to soak up the sauce); a package of Kraft white sharp grated cheese; and whole milk. I already had unsalted butter, flour and of course the lobster.

One of the tips from the recipes (I think it was Ree Drummond’s) was to lightly warm the lobster pieces in a skillet of melted butter first and then set aside; otherwise the lobster might be watery. After that,  it’s the usual 3 tablespoons of unsalted butter, 2 tablespoons of flour stirred in to make a roux and then, adding whole milk to make a bechamel sauce base and then melting the cheese in it. I planned to do that, then folded in the buttered lobster pieces, mixing gently. For the finishing touch, I melted a little butter in the microwave and stirred some panko crumbs in it, covering them to make them brown in golden bits on top of the casserole. I then grated some fresh parmesan cheese on top and baked it in a 350 degree oven for about 45 minutes.

The proportions of the sauce and the macaroni was perfect as it baked – because when we served it, there was no gooey mess (too much sauce) and the plump elbow macaroni was scrumptions! I could have eaten the whole thing without lobster too – but that too was good. Gives me some more ideas of other simple macaroni casseroles to make – with ground beef, green peppers, onions and tomato sauce, right?