mulberryshoots

"Tell me, what is it you plan to do with your one wild and precious life?" ~ Mary Oliver

Category: Uncategorized

Super Bowl barbecued chicken wings! . . .

DSCN0285
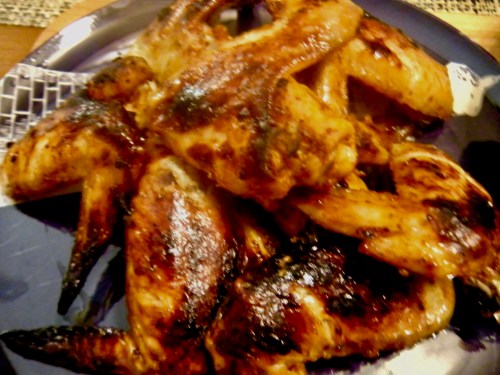
Well, I have to admit that I’ve never made chicken wings for a football game. But since this might be a chance for the Patriots to win a 6th Super Bowl game, I thought I’d give it a try. Especially since I’m hoping that they’ll win without having us bite our fingernails to the very last minute! GO PATS!!

I bought a pack of chicken wings at the store, rinsed them well and dried them, placing them into a big mixing bowl. In a separate bowl, I mixed together the homemade barbecue sauce:

1 scant cup of Heinz ketchup; 2 Tablespoons of Poupon dijon mustard; 2 Tablespoons light brown sugar, a squirt of honey, 1 Tablespoon Worcestershire sauce, 1 teaspoon smoked paprika, hand ground coarse pepper, Lawry’s garlic salt. Stir together with a spoon and add to wings, stirring until they’re covered with the sauce.  I left the bowl of wings on the countertop, placing a dinner plate over the top.

When it was suppertime, I placed the wings onto a cookie sheet covered with aluminum foil and roast them at 375 degrees until cooked through. Then, I switched the oven to the broiler and browned the wings until they’re golden and crispy.

At the same time, I baked some cornbread with creamed corn to go with the chicken wings. Might grate some fresh cabbage and onion to make a light coleslaw to add some crunch to the meal.

We are hoping the Pats pull off another win. But all the others have been so suspenseful that I’m hoping for an early lead so that I can sit back, relax and knit during the game! Either way, I just hope they WIN!


“chicken alphabet soup”. . .


DSCN0218

It feels like we’ve been eating too much beef lately. It’s good, but yesterday while I was in the grocery store, I saw a small whole chicken and thought it might provide a nice change.

Last night for dinner, we had a roast chicken with stuffing, onions, carrots and tiny potatoes. Today, I’m making a chicken noodle soup to go with leftover chicken sandwiches for supper. (Since we favor dark meat – thighs and drumsticks, wings and so on, we usually have a good amount of breast meat left over.)

But instead of re-cooking the breast meat into a soup that would dry it out and make it tough to eat, I’m going to slice the cold chicken thinly and make old-fashioned chicken sandwiches, not chicken salad, just chicken with Hellmann’s and toasted oatmeal bread.

For the soup, I’m going to add chicken broth to the carcass pieces and leftover onions and carrots. Simmer gently. Removed the carcass pieces and harvested any leftover chicken from it, placing the chicken pieces back into soup broth. For a playful touch, I found some miniature alphabet macaroni in the pantry and cooked it separately.  I added it to the soup, tasted for seasoning and added a little salt.

At dinner time, I served bowls of chicken alphabet soup with our sliced chicken sandwiches alongside. Simple and frugal. I’ll have to think of what to have for dinner this weekend. It’s not Super Bowl weekend yet so I think we’ll keep eating light. Or almost light.


spinach and cheese quiche for supper. . .

gruyere-spinach-quiche-recipe-2

(photo courtesy of “SheWearsManyHats.com”)

We live in New England and the weather has been grey, foggy and icy. It’s about 28 degrees out and raining: a recipe for icy sidewalks and streets. A good day to stay indoors. Surveying the possibilities for supper tonight, I have a third of a bag of frozen spinach, some shredded cheddar cheese, fresh eggs (thank God!) and milk. This spells quiche to me except for a tender pastry crust.

Looking on the internet, I came across the NYTimes recipe for a short crust made in ten minutes with flour, salt, butter and ice water.  I decided to cut the cold butter into the flour/salt mixture myself rather than using a food processor. Then I wrapped the ball of crust to chill in the fridge for at least 2 hours. The chilling requirement made me get up off the couch and put together the crust before lunchtime rolled around!

Now, all I’ll have to do near supper time is to saute a chopped shallot in butter, add the defrosted spinach and season with salt. Roll out the crust and press into a pie pan. Preheat the oven to 400 degrees and pre-bake the crust (which might shrink a little.)

Add the cooked spinach mixture to the prepared crust; then sprinkle with 1/2 cup of shredded cheddar cheese. Beat four room temperature extra-large eggs and add 1 cup of fresh whole milk and combine. Pour the egg mixture into the spinach/cheese mixture. Sprinkle with freshly grated parmesan cheese and place the quiche into the oven for 45 minutes or until puffed and golden brown.

So this is our warm and tasty supper from almost thin air! Hope the weather will improve tomorrow: Bon Appetit!


roast cornish hen with stuffing. . .

fullsizeoutput_120
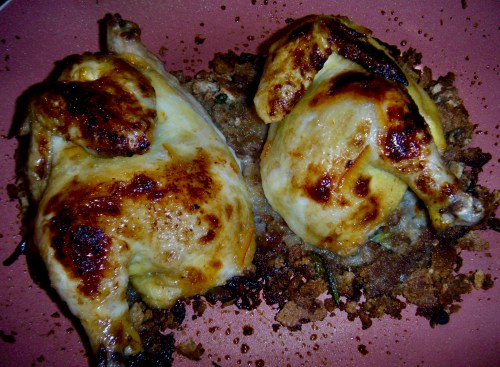
One of our regular dinners is roast cornish hen with stuffing. The size of these small birds is ideal: half for each of us. Plus, they roast up beautifully with a glaze of orange marmalade & a dab of butter, set up on a bed of Pepperidge Farm stuffing.

The stuffing is made by sauteeing chopped a shallot with some chopped celery heart in butter and a sprinkling of Bell’s Seasoning. Then, I add the chopped up giblets and brown with the vegetables. Add some Pepperidge Farm stuffing crumbs and chicken broth to moisten.

I empty the skillet of the cooked stuffing and then melt some butter in the clean skillet. The hen is split in half by cutting through the breastbone. I dry the rinsed halves and  brown them in the medium-high skillet.

After the cornish hen is golden brown, the stuffing is divided and the two halves placed on top.  In the microwave, I heat up some orange marmalade with a dab of butter and brush it on the bird before sliding the pan  into a pre-heated 375 degree oven for about 35 minutes.

When the hens are cooked through (meat thermometer at 165 degrees,) take them out of the oven. With a wide spatula, lift each serving with the stuffing on the bottom and place it on a plate. A salad of lettuce, avocado and blood orange goes along well with this dish.

As G. and I prefer the dark meat, so we usually finish that off and save the breast meat for a tender chicken salad sandwich for lunch the next day.  Bon Appetit!

fullsizeoutput_11d


Braised veal shanks . . . aka “osso bucco”


DSCN0189

Yesterday, I saw a can of white beans (cannellini) in the pantry, I had some grape cherry tomatoes in the fridge and some lovely broth in the freezer I wanted to use. As I drove to the grocery store, I dismissed making beef stew (boeuf bourguinon,) or pot roast. We had a truly lovely boneless prime rib roast for Christmas Eve and a ham for New Year’s Day.

To my surprise, I found some veal shanks and the label said “osso bucco.” I’ve cooked veal shanks in the length-wise cut but not “osso bucco” although I’d read rapturous descriptions about this dish over the years. When I got home, I looked up a number of recipes for this dish and found that some used white wine while others called for red wine. Some called for lots of stewed tomatoes and others called for tomato paste.

In no recipes did any include bacon (I had a few slices that I’d wanted to use – and the boeuf bourguinon recipes call for bacon in the beginning. Nor did they include white beans which I have used in a braised veal dish awhile ago. So, here’s my version of braised veal shanks which I think will be lovely for our dinner tonight.

  1. Tie shanks together with twine, salt and pepper them and lightly dust in flour.
  2. Cut up 3 slices of bacon into small pieces and brown in a heavy enamelled deep braiser pan.
  3. Add and brown chopped garlic (3); onion (1 small whole) and quarter cut carrots (5) in the same pan. Stir and cook until aromatic and golden brown. Add halved grape tomatoes and rinsed large white beans (canned.)
  4. Make a well in the middle of the cooked vegetables and add a little olive oil; Place the prepared veal shanks in the center and brown on both sides.
  5. Add fresh sprigs of rosemary and thyme.
  6. I sprinkled a little red wine on top of and around the veal bundles; then added Chicken stock until the liquid almost covered most of the contents.
  7. Place the pot into a 350 degree oven and cook for 2 1/2 hours until veal is fork-tender. Let it rest.

Open up some refrigerator rolls and bake a batch of crescent rolls. Serve the braised veal and vegetables on top of a bed of cooked fresh noodles in shallow pasta bowls.   A small tumbler of chilled Riesling seemed just right to drink with the meal – besides that’s what we had opened!


a new year’s apple pie! . . .

DSCN0164DSCN0160.jpgDSCN0158.jpg

Today is January 3rd, a Wednesday, and I thought it was a good time to go through the fridge and straighten it out after the holidays. In the middle shelf were two unopened pie crusts that I hadn’t needed for the mince pies that I had made and frozen earlier. In the fruit bin, I plucked out the Harry and David pears and apples, putting them into an old wooden bowl on the bottom shelf – and about six Honey Crisp apples that needed a new lease on life.

So, I peeled the apples, cored them and sliced them thinly. Made a mixture of flour (a small handful, light brown sugar (same) and a resplendent sprinkling of Penzey’s Indonesian cinnamon that my daughter, C. had given me.) Yum! After consultation with G., I added a generous handful of golden raisins (we love them plumped up and warm in baked goods!

One pie crust came out of its sleeve and cooperated as I patted it into my glass pie pan. The other one was kind of stuck together and unshapely after I smoothed it out on the board I was using. So, I took out my pie crimper roller thingie and cut generous strips of pie crust to cover the top. A brush with half and half with sparkling sugar sprinkled on top (love that stuff!) remembering to insert tiny pats of unsalted butter into the holes peeking out on the crust. Into the oven it went with an aluminum sheet underneath in case it drips and overflows.

Usually when I make apple pie, I prefer to use Cortland apples. They are crisp when raw and melt down to a beautiful apple pie. These Honey Crisp ones are probably not going to do that but they should be tasty, nevertheless.

So, in two swipes, the fridge is clean (YAY!) and there’s an apple pie happily baking away in the oven. And this is even before we have lunch!

Happy New Year!


cream scones . . .


I’ve made scones before but not like these. I followed the recipe from “Bon Appetit’s best cream scones.” Usually when a recipe calls for blending cold hard butter into a dry flour mixture like this one does, I gently process it in my Cuisinart. Today, however, I used a deep shallow bowl and stirred the dry ingredients together (baking powder, soda and salt, measuring the flour loosely into a cup.)

Taking a stick of unsalted butter, I used an old fashioned pie crust thingie and mixed the flour mixture with the butter until it was the consistency of coarse corn meal. Into a well made in the middle, I folded in a beaten large egg. Gently, I added a cup and a quarter of cream, mixing it in until the flour mixture held together. It was a little sticky, but after I floured a board, just dipping my hands into some loose flour, I patted the dough until it was one inch thick. Instead of cutting the circle into wedges, I used a square crimped edge cutter, lifting the soft dough and putting it on parchment paper placed on a baking sheet.

In a preheated oven of 370 degrees (5 degrees less due to the dark finish of my baking pan,) the scones were baked until golden brown (25-30 minutes.) I had brushed the tops with cream and sprinkled sparkling sugar on top before putting the scones into the oven.

When my daughter, C. and her husband T. arrived, we split the scones in half, added warm raspberry jam and cream fraiche, a new flavor called Madagascar vanilla. It was a delicious combination eaten along with hot Lapsang Souchang tea. Fresh raspberries added to this afternoon treat.

Just lovely for a holiday respite!


rosemary shortbread . . .

fullsizeoutput_f9

The tray of rosemary shortbread is the third one I’ve made over the holidays. Each time, I’ve tweaked the process and this batch is the result of a few lessons learned.

I followed Melissa Clark’s recipe from the NYTimes. She suggests adding all kinds of things to it like raisins or nuts, etc. But what I was hoping for was a classic shortbread the way the Scots and British like it – but flavored with fresh rosemary leaves.

The first time I made it, I didn’t run my Cuisinart food processor long enough for the dough to come together. Instead, it looked like crumbly bits of pie crust and I pressed it into a baking pan. It was so loose you couldn’t prick it with a fork before baking. So, I did the fork pricks at the end. It’s also important to cut the shortbread once it cools a bit, but not until it’s cold – very hard to cut at that point.

The second time I made it, the “dough” improved a little. Today, when I made it for the third time, I observed that instead of scraping into the flour bag for a cup of flour, that I loosened it up first, then I gently piled it into the cup. Turns out, compacting flour or letting it lie loose in a measuring cup makes a notable difference in the amount of flour you (think) you’re using. Hence, too much flour doesn’t combine with the butter/sugar mixture – it stays crumbly. I’ve also noticed this flour measurement phenomenom when making chocolate chip cookies (they cake up instead of flattening out with the brown sugar) and brownies too.

Sure enough this time, the mixture consolidated into a dough-like ball after processing. I pressed it into an 8 X 8 pan with my fingers and baked it at 340 (slightly lower to accommodate the dark finish of the pan) for about 45 minutes. When it turned golden brown on the top, I took it out, pricked it with a fork – and cut it into squares before it cooled completely.

It’s a tender, tasty shortbread to make and goes well with hot tea or coffee.

Hope you will enjoy them – and treat yourselves and family to these sweet, savory treats.

Happy New Year!


thank you, “mother earth”! . . .

I’ve debated about joining a CSA for the growing season and this year, I decided as usual to take my chances going to farm stands for vegetables and fresh corn when it’s in season. Berberian’s Farm is about 20 minutes drive from my house and today, I was especially impressed with the produce – locally grown at the farm and picked at the peak of perfection – small beautiful eggplants, rosy radishes, patty pan squash, golden beets and of course ears of their wonderfully sweet butter and sugar corn. (They also have Silver Queen white corn later in August which is even sweeter and more succulent than the B&S they have now.)

This armful of freshness cost less than $15.00! The end of July and beginning of August is sweet corn season – and some years, we’ve had it available all the way to November, believe it or not! Rolled on a stick of chilled unsalted Kerrygold butter and sprinkled with Maldon Salt, bathed in freshly ground peppercorns: this is heaven for everyone – whether you’re going on vacation in August or staying home like us to savor the bounty of Mother Earth in the peak of summer! YAY!

green gazpacho! . . .

For the last few years, my granddaughter has given me a subscription to the cooking magazine, “Bon Appetit,” for Christmas and I have consistently found recipes to try out in almost every issue that I have received. It arrived in the mail yesterday (thanks again, Anna!) and I saw a recipe that I wanted to make right away: “sippin” green gazpacho made with cucumbers!

This morning, I pulled together the ingredients: two large English cucumbers ($1.29 each at Trader Joe’s,) fresh arugula, fresh parsley and cilantro, wine vinegar, salt and extra virgin olive oil. It looked appetizing even before I put them into the large Cuisinart. I filled the processor to the brim with chopped cucumber, greens (fresh arugula, parsley, cilantro, basil leaves,) two large cloves of chopped garlic. Started the motor up and waited for the greens to emulsify and then added lots of Maldon salt, 4 tablespoons of wine vinegar and  3/4 cup of olive oil.

I opened it up and tasted a spoonful – a little grainy because I hadn’t peeled nor seeded the cucumbers but it was refreshing and tasty. I ran it a little longer and put in a little more vinegar and salt according to the recipe which advised it should be saltier and more acidic because when it cools down a few hours in the fridge, its taste will be more muted.

As I transferred it into a container to chill, I also put two glasses in the freezer to use when it is served. I might add a slice of fresh lime and some fresh basil leaves on top!

Wow! So easy and appetizing – plus, it could be a healthy substitute for lunch too!